
First make sure you install the module using the Joomla Installer in the administration, and then that you've published the module into the position you desire. Then you will be ready to change and configure the settings.
Go into the Joomla Administrator, and find the Module Manager. Here you will see a list of all modules, and go through until you see the captifyContent module. Click on the title and you will see the parameters that you can adjust for the module. When you need more information about a setting, roll over the text to the left and a tooltip will appear. Make sure to hit save when you are done.
Please note that if the section, category or content item does not have an image assigned to it in the section/category admin or the content item article then that section/category/content will not display.
Please note that the implementation of the category option in Joomla 1.6 is slightly different. Please read the description below for more information.
Display images from sections, categories, Joomla content or K2 content?
Select between displaying either sections, categories, content items or K2 Content.
If you are using the module in section or category mode then the image that is referenced by the captify module is the image that is assigned to the section or category in the section or category manager. You can change this image by going to either the category or section manager, clicking on the category or section you want to edit and then selecting the image from the drop down list.
If you are using the module in Joomla content mode then the image is referenced from the first image that is displayed in the intro text. If there is no image in the intro text then the module will not output a block for that particular content item.
If you are using the module to reference K2 content items then you have the choice to display the first image in the K2 item or to display the image stored in the K2 item image field. This is set in the k2 options at the bottom of the module parameters.
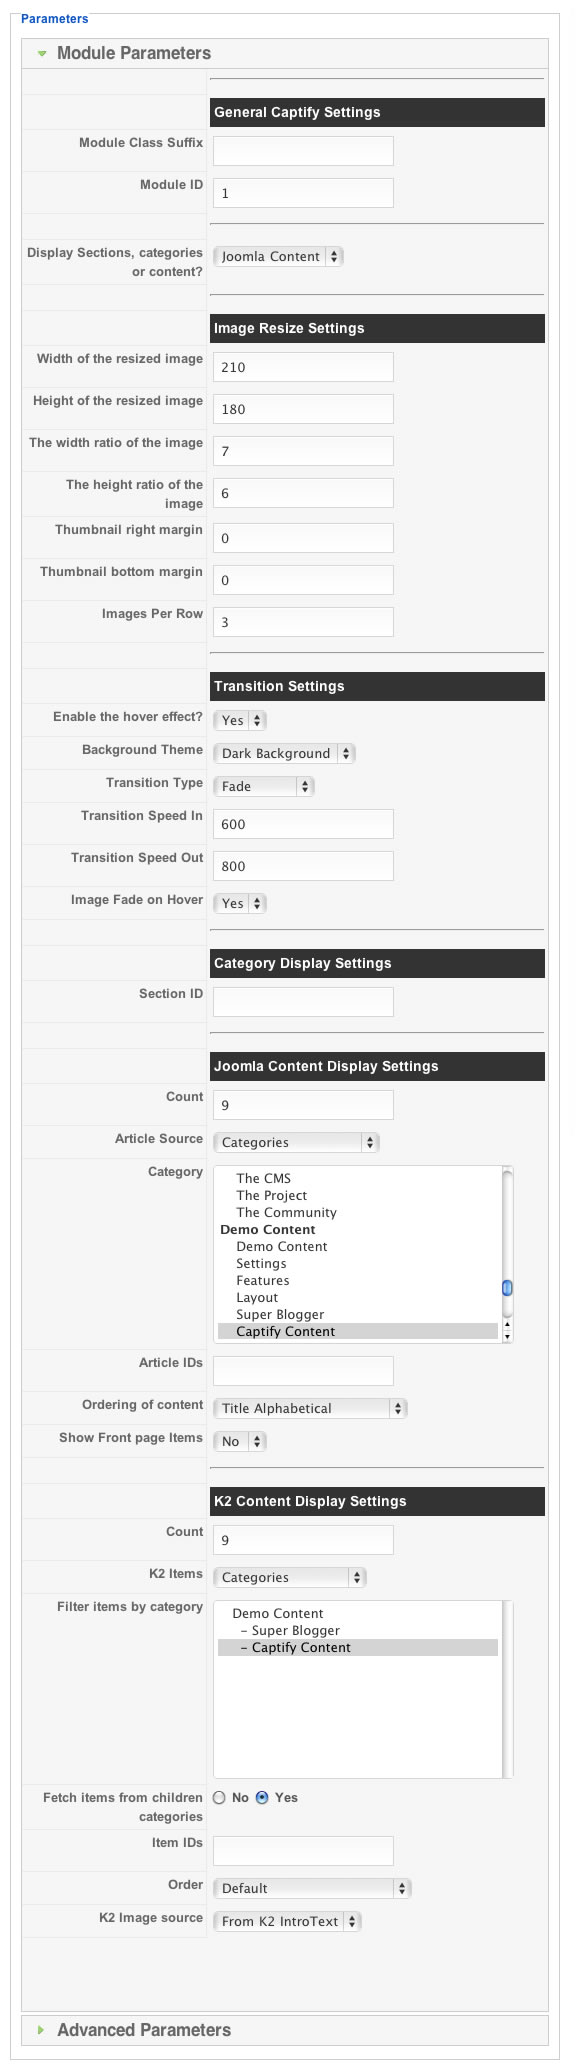
Width of the resized image
Set the width that the image should be resized to.
Height of the resized image
Set the height that the image should be resized image.
Crop Width and Crop Height
Set the crop width that the image will be resized to. To retain the original dimensions of the image you need to make sure that the crop width and crop height reflect the dimensions of the original image. eg if the original image is 800px high by 1200px wide and you want to display the image at 200px high by 300px wide then the crop width needs to be 3 and the crop height needs to be two.
Enable the hover effect?
This option enables the fade in effect. If this option is set to no then the settings below become irrelevant.
Background Theme
This setting determines the colour of the fade area when the user hovers over the image. You have a choice between light and dark.
Transition Speed In
Denotes the speed that the transition occurs when you mouseover the image. Select from Fast | Normal | Slow
Transition Speed Out
Determines the speed that the caption disappears after the mouse leaves the image. Select from Fast | Normal | Slow
Transition
Select between opacity (fade in), slide down or slide up to determine how the title of the section appears above the image.
Image fade on hover
Creates a fade effect when the users hovers over the image
Section ID
If using the category display option then you need to set the id for the section that the categories will be referenced from.
Go to section manager and look at the last column called id in the row that relates to the section that contains the categories you want to display. Please make sure that the categories have an image assigned to them.
Count
Specify the number of sections, category or content items to be displayed. Only those with images associated with them will be shown.
Category
Select the category that you want to display your content items from.
Article Id
This option can be used to specify specific articles to display in the captify module. Please ensure that you have also included the category the article resides in in the selection above
Ordering of Content
Content items displayed can be ordered by : Most Recent First | Oldest First | Title Alphabetical | Title Alphabetical Reverse | Most Read | Least Read | Default Ordering
The settings below are relevant if you have selected K2 as the content source in the content source option at the top of the parameter list.
Count
Specify the number of sections, category or content items to be displayed. Only those with images associated with them will be shown.
K2 Items
This option allows you to filter specific types of K2 items. eg Categories, Items, Categories + items, Featured Items
Category
Select the category that you want to display your content items from.
Fetch items from children categories
This option determines whether K2 items from categories within the main category will be retrieved. if you would prefer to retrieve items in the top level category only then set this to no.
Item Id
This option can be used to specify specific articles to display in the captify module. Please ensure that you have also included the category the article resides in in the selection above
Ordering of Content
Content items displayed can be ordered by : Most Recent First | Oldest First | Title Alphabetical | Title Alphabetical Reverse | Most Read | Least Read | Default Ordering
K2 Image Source
You can choose between the first image in the intro text of the K2 item or you can choose the image from the item's image field.
The way that captify content has been implemented in Joomla 1.6 is slightly different to the Joomla 1.5 version.
The Joomla 1.5 version of the captifycontent module when used to display images from your categories used the image that was assigned to the category via the category image option.
While in Joomla 1.6 the image is referenced from the category description. This means that in order to display an image from the category in the captify module all you need to do is insert the required image into the category description and not in the category image selection as in the previous version.
I installed the module, but cannot see it?
When you install the module, it is setup in the module position 'left' and also disabled. Check that you have moved it to the appropriate module position, and that it is enabled.
Do I need jQuery?
Yes, the module requires it. Please install and publish the JB LIbrary plugin to use this module.
Images are not loading, why?
This is possible for a few reasons. If jQuery is already included on your site by the template or another extension, then make sure to disable it in in JFlickr. Secondly, make sure your selected content items have images associated with them.
The module appears on the page after I click on one of the images or How do I get Captify Content to appear on just one page and not the sub pages?
This is a common issue in Joomla that relates to menu id's. Joomla determines where modules should be loaded based on menu items and so if a menu item does not exist for the content category you are trying to display then Joomla will use the home or default menu item.
The solution to only having the captifyContent module appear on the first page is to create a dummy link to the category/categories you are trying to display in the module. Its important to realise that this menu does not need to be visible on the site but it needs to be in the site's database.
As an example if you want to display content from a category called "folio" then you need to create a menu item of a blog > category type that points to the folio category on your site.
Once you have created the menu item then ensure that the captify module is not assigned to the newly created menu item.