
Shop Ignition is the ideal solution for your online Joomla shop. It sports templates for the Tienda and Red Shop ecommerce extensions as well as a flexible and clean K2 template. The bold colour highlights offset the clean design with subtle css3 shadows to provide the perfect vehicle for getting your online shop moving.
Please note: This template uses the Zen Grid Framework. You can download the latest version of the framework on the Zen Grid Framework download page.
The following steps outline the process involved for setting this template up in a new or existing Joomla installation. Please note: We recommend users use our quickstart packages if they have the opportunity to start completely from scratch.
At this stage you will have a very basic looking template ready for you to customise, add your content and start setting up the other modules you can see on the demo for the Colourshift template.
For more information on replicating the front page layout or other extensions used on this site please read the information provided on the frontpage and extensions tab.
The screenshot below highlights the module positions available in this joomla template. 
The Zen Grid Framework allows for flexibiility within individual templates while maintaining the same core codebase. The following are the specific variations to the Shopignition template.
Layout Overrides: Shopignition uses the Zen Grid framework layout overrides to help create the unique layout that you see on the Shopignition demo site. You can find these files in the templates/Shopignition/layout folder. In general you do not need to touch these files but if you need to make some changes to any of the following areas, then this is where you need to make them:
If you need to edit or change the layout across any of these areas of the template then you will need to edit the files in the layout/ folder.
The screenshot below shows you the modules we have published on the front page of the demo site. Please see the descriptions below regarding the usage and any other relevant information of the modules.
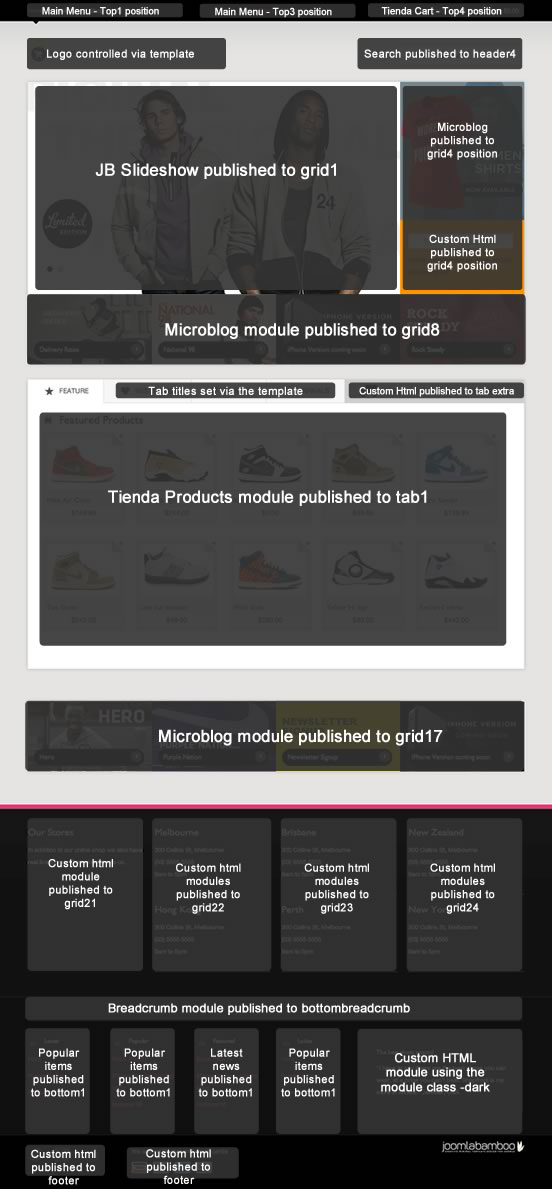
At this stage you should have a pretty simple and straight forward site to start creating your site from. It's important to remember that the slideshow and micro blog modules rely heavily on images in terms of the way that they present your content so it might be worth adding placeholder or stock images in your content as you go through setting up the rest of the modules.
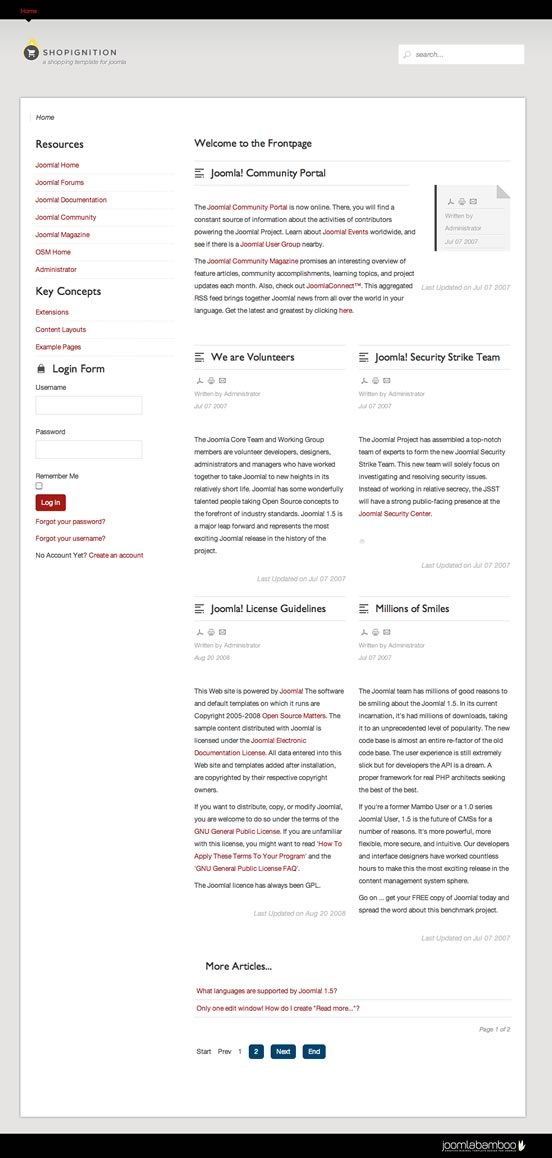
The screenshot below shows you the default Joomla installation after following the points above.
The screenshots below highlights the settings of the various modules included on the front page.

No Margin in the grid1 to grid4 positions.
The layout overrides for the grid1 row of modules eg grid1 to grid4 have the margin removed that is normally used in the grid rows between module positions. This small tweak has allowed us to create the grid effect that locks the slideshow in grid1 and the modules positioned in grid4 so nicely.
Assigning a width and a height to the grid4 position.
Since its not always possible to lock widths to the pixel across all browsers we have opted for the ability to set an explicit height and width for the modules assigned to the grid4 position.
There are two basic settings for controlling the layout of this module position. If the width for the grid4 position is not set explicitly then the width is set as per the usual column method with an adjustment of an extra 1.3 gutter value width to compensate for the lack of margins in this row.
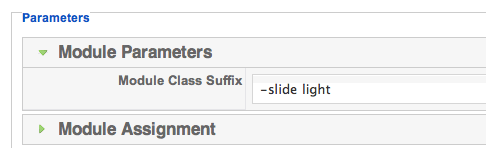
Or alternatively you can set the exact pixel width of the grid4 position in the case of needing to vary the width assigned to the module. This width can be set via the template parameters underneath the grid1 row layout settings as per the screenshot below.

Ignition comes with six bold colour highlights together with clean design and subtle css3 shadows - all providing the perfect vehicle for getting your online shop moving.
This Joomla template comes with a selection of module classes that are available to be used to personalise the look of your site.
The syntax used to trigger the following module classes includes the name of the class you are invoking plus a '-' before it. eg -blue, -arrival etc
Module class colour examples.
Module class icon examples.
In addition to the colour module classes shown above Shop Ignition comes with 27 icon based module classes that are ideal for adding to the titles of your modules. You can see the icons below. The JB Type plugin has been updated to also include these icons so please make sure you catch the new classes available for this template on the JB Type page.The icons featured come form the Iconic icon collection.
Microblog module class for frontpage items
The appearance of the microblog items on the front page of the Shop Ignition demo is achieved by using the -microblog module class for each instance of the microblog modules. This class is ideal for only displaying the image from the Joomla content item or the the K2 item as well as the title of the item.
The Shop Ignition template uses some unique styling when it comes to the layout out of what we call the meta info on the Joomla content and K2 item pages. You can see this styling in action for the date, author name etc on the demo site. To avoid separating the details out into a second column you can apply the words "simplemeta" to the page class for the menu item that controls that page and the layout will revert to a more traditional layout with the meta infor situated directly beneath the item title.
The module classes displayed above can be used in conjunction with the sliding module function that comes as a core feature of the Zen Grid Framework. The screenshot below highlights the syntax required to replicate the slide with any of the above classes.
There are a number of different ways to recreate the icon menu as seen in the above module position on the demo site, but for the demo site we have used our modification of the yv BB Code plugin that we have used off and on for the last few templates. The setup is very easy and can be achieved as follows:
1. Install the JB BB Code plugin
2. Ensure the plugin is published by going to the extensions > plugin manager in your site administrator.
3. Assign a core Joomla menu module to the above position and select the menu you want to use there.
4. Navigate to the menu manager and select the menu that you have just assigned to the menu module.
5. Upload the icons that you would like to use to the images/stories/icons folder on your website (This step is only necessary if you havent used the quickstart package as the icons are already in that folder in the package). The icons used in the demo are available in a separate download on the Shop Ignition download page.
6. Create a new menu item and use the following code to create the menu icon. If you like you can specify the full url or relative url to the icon image :
[img]images/stories/icons/heart.png[/img]All products<
Please note that the above example has spaces inserted into the img tag to avoid the code from rendering here.
7. Complete the rest of the menu item setup and click save.
The new menu item with the icon should appear on your website's frontend.
Fonts in the Zen Grid Framework can be controlled via the appearance > fonts panel in the template administrator.
The default fonts used in the Ignition template are:
All of the extensions available from Joomlabamboo are compatible with this template. Not all are required for the running of the template and only some are featured as a part of the demo site.
The modules used on the demo site include:
Please see below in the frontpage setup for screenshots of the modules as they are setup on the demo site of this template.
Although the this Joomla template is a simple design the default Joomla sample data doesnt quite do it justice and so here are a few steps to do if you are installing this Joomla template into a default Joomla installation.
Elements to install.
Essential elements
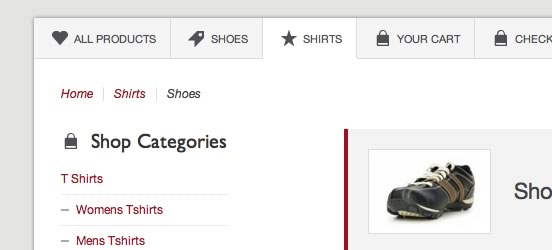
The Shopignition Joomla template has K2 overrides built in and are activated simply by assigning the Ignition template in the K2 category or via the K2 menu item if you are displaying multiple categories form that menu item. As you can see from the screenshot below the Shopignition K2 template takes all of the K2 meta information and outputs it into a slim right aligned column. If the meta info like date, comments, rating etc are not published then the item will just stretch to the full width of the content body.
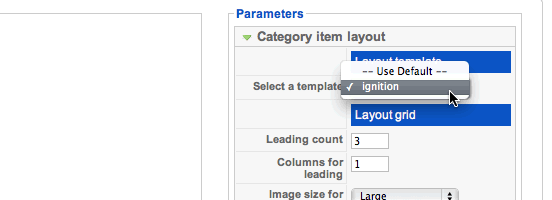
To assign the Shopignition template to your k2 categories and items you need to edit the category and apply the Ignition K2 template as per the screenshot below:
Tienda
In the past we have used specific product and category overrides for Tienda that required the user to select a specific template file for the category. Shop Ignition uses direct overrides so it is no longer necessary to specify a category or product layout for the category or the item - the Shop Ignition Tienda template is applied automatically and all that is required to use the Shop Ignition styles is top ensure that the Tienda css is enabled in the Shop Ignition template parameters:
eg appearance > set Tienda css to yes.
Tienda Modules used on the demo
The following modules were used on the Shop Ignition Demo site.
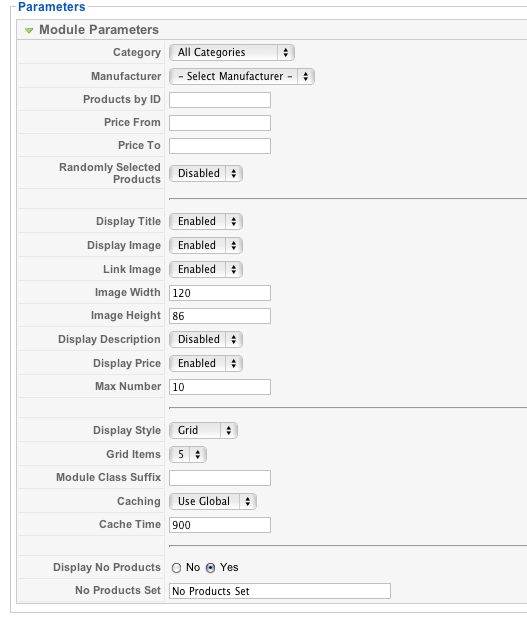
The following is a screenshot of the settings used in the Tienda Products module used to recreate the grid layout as seen on the demo site.
The future of Tienda and where to get support.
Tienda currently comes in a Community version, but soon an Enterprise version will be available that will include many more features. If you have issues related to Tienda outside of the way that things appear in the shopfront template, you should direct those questions to Dioscouri. They provide support plans for both versions of Tienda, which would be well worth the investment to get your store up and running flawlessly.