
Maps2 is a super easy tool to use to add a google map to your Joomla website. To get started just enter a location to search for and then when you have found it click on the preview where you want to place your marker. You can also drag the map preview in the admin to position the map perfectly on the front end. Also be sure to check out the different map styles in the styles tab. Have fun!
Note: As of 22nd June 2016, all new applications using the Google maps api require an api key. More information: Google Developers Blog. If your installed version does not have an api key field in the advanced tab, please update to the latest version of the module.
Note: The weather, cloud and panoramio layers have been discontinued by Google and will no longer work. These options have been removed from the module. More information: Google Developers Blog
The preview map and the usual Joomla form controls are designed to work together to make it easier for you to position and style your map. Making changes on the map will alter the form fields and changing the for field values will also make the changes to the map, so you get an instant preview of your changes. You can zoom, drag, tilt and change the map type and the settings will be updated accordingly.
Location Search - This is a free search field which uses the geopositioning api to help you find a location. Start typing an address, zip/postal code or landmark in the field to centre the map on the location. The search is provided by Google and will return the same results as when searching on Google maps. The field has no effect on the front end of the site, it is just to help you position the map.
Map Size - The width and height of the map can be specified in any standard css units (px,%,em) and the preview map will adjust to the new size. If you specify a width larger than the available space in the admin area, the value in the width field will still be used on the front end of the site and the map will be centred using the same position on both maps.
Zoom - There are 21 levels of zoom available from 0 to 20, 0 being the lowest zoom and 20 the highest.
Adjusting the select list will change the zoom level on the preview map.
The preview map zoom can be adjusted in 2 ways. If the zoom control is enabled, using it will change the value of the select list. You can also use the mouse wheel to zoom in and out on the map, also updating the select field.
The map cannot be zoomed by double clicking as click events are reserved for adding and removing markers.
Tilt - Tilt will angle the map at 45° to give some perspective to the map image. Tilt is only available at zoom level 18 and above for supported areas. If tilt is set to 45° and a map is zoomed out then it will reset to 0 until zoomed in.
Heading - Heading allows you to rotate the map at 90° intervals. It is only available when tilt is enabled so the same restrictions apply to heading as they do to tilt.
Position - The Latitude and Longitude values determine the centre of the map. If you already have the correct values you would like to use then you can add them here. If not, then you can use the location search to set the approximate centre and then drag the map around until you find the position you want to use, the fields will be updated automatically.
Type – The 4 standard map types are supported.
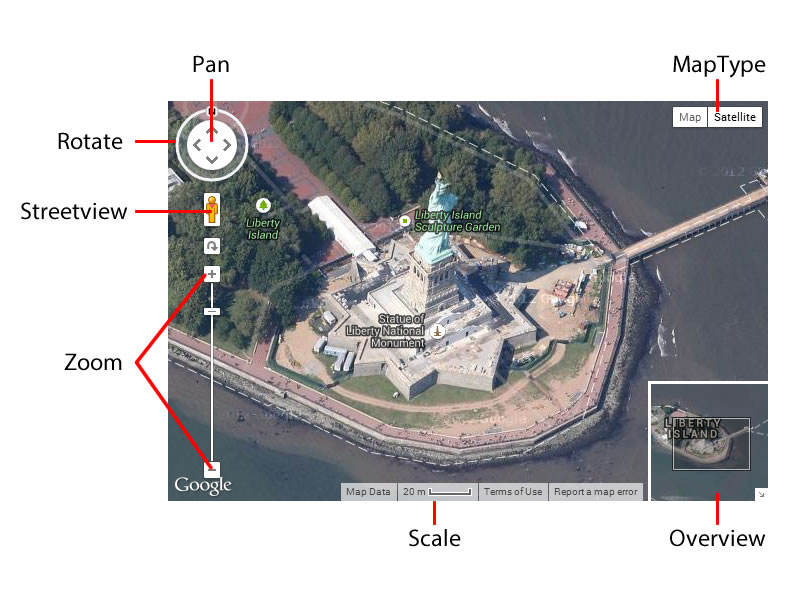
Controls - The radio buttons toggle on and off the different map controls available for the user (and also in the preview).
Placing markers - Markers are added to the map with a single mouse click and will be placed at the location of the click
Moving markers – You can move the location of the marker by clicking and holding with the mouse and dragging it to a new location.
Deleting markers – To remove a marker from the map you can double click on the marker. A confirmation window will appear to prevent accidental removal.
After adding a marker to the map, a new set of buttons appear above the map preview window.
Remove all markers - This will clear all marker information from the map.
Fit map to markers - If you loose track of placed markers or simply want to zoom the map to fit nicely around the markers that have been placed, this button will re-zoom and re-centre the map to make all placed markers visible.
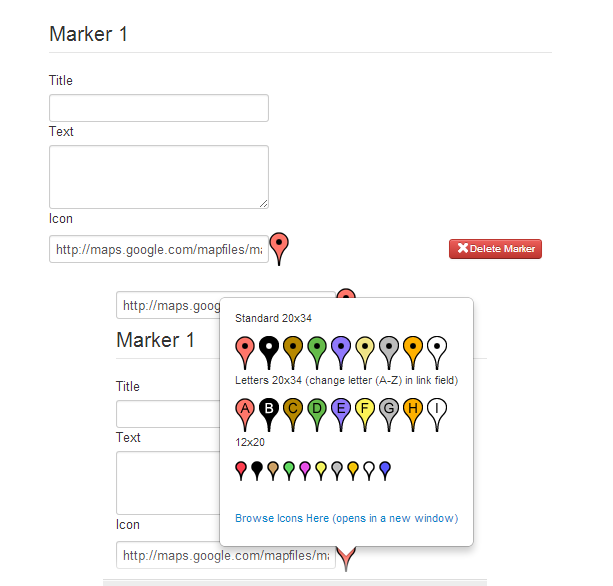
After a marker has been placed, a new set of fields are created under the markers tab where you can add a title, info window text and choose a marker icon (or enter a custom one).
Marker title - The marker title is the text that is shown when the mouse is hovered over the marker. It does not show in the info window.
Marker Text - This is the text that is shown in the pop-up info window when a user clicks on a marker. It can contain html.
Marker icon - The current marker icon is shown to the right of the marker field. Clicking on the marker opens a pop-up with a number of selectable alternatives, you can click on another marker to replace the current one. You can also enter the url of your own icon directly into the icon field input.
Delete marker - This removes the selected marker from the map. You can also do this on the map by double clicking the marker.
The Google maps api offers a number of additional layers that can be added to the base map tiles. These options can be found in the layers tab and are outlined below. Enabling a layer will also add it to the preview map. You can use more than one layer on a single map.
Traffic layer - The traffic layer shows Google traffic information for major roads (not available in all locations) . The colour of the roads is explained as follows:
Transit layer - The transit layer shows public transportation (limited to major cities). The colour of the transit line is based on information provided by the transit operator. Enabling this layer will alter the base map style to emphasise the overlay.
Bicycling layer - Enabling this layer highlights bike paths, bike routes and other overlays specific to cycling. Enabling this layer will alter the base map style to emphasise the overlay.
KML layer – Keyhole Markup Language is written in xml and is specific to geographical annotation. You can create your own kml file and add the path to that file in this input to add it to the map. You can write kml files by hand or generate them using the Google Earth application and other online tools.
The Google maps api v3 allows you to customise the presentation of the standard base map tiles. It works by targeting specific map features (featureType) and then applying hue, colour, lightness/gamma values to those features (Stylers).
The styling information is written in the JSON format.
The styles tab contains a number of links to sites that either help you to produce the styling information, or provide code for pre-defined styles.
A preset option is provided in the module settings above the preview map. It contains a number of popular map styles which can be added to the map by selecting the name from the dropdown list.
Selecting a preset will populate the styles textarea with the JSON information for that style.
To add you own styles to the preset to use again in the future, you can save your styles in a JSON file and add it to the modules preset folder (no spaces in the file name). The file name will then show in the preset list.
Styles not working - If you find that your styles are not added to the map,there may be a problem with the code syntax. If the code is not valid, a red warning box will appear above map styles input and the style will not be applied to the map. The warning will be removed when any errors are corrected.
API Key - Added in version 1.2.3. Google now requires an api key for all new domains using Google maps. Instructions for generating a new key can be found here.
Loading the API - By default the module will load the maps api from Google.
If another extension on the same page is also loading the maps api then it can lead to errors. In those cases you can use this option to prevent the module from loading the map api file.
Reloading the Map - For the map to load correctly, it needs to be in a position that is visible when the page is loaded in order for the map to know the dimensions of the area it should fill.
In some cases you may want to load the map in a position that is hidden on pageload such as in a tab or modal. In these cases a re-initialization of the map is needed once it becomes visible. This is possible through the 'Trigger Selectors' and 'Trigger Delay' options in the advanced tab of the module options.
Trigger Selectors - A jQuery selector can be added to the input to cause the map to reload when the selector is clicked. Any quotes need to be double quotes and multiple selectors can be added separated by a comma in the usual jQuery format.
Trigger Delay (optional) – Sometimes there needs to be a delay in the initialization after the click event has been triggered. For example, if the map is in a sliding tab that takes 500 milliseconds to appear due to an effect, it may be necessary to delay the reload slightly. You can add an integer value to this field to delay the reload by a specified number of milliseconds. If the field is empty there will be no delay on the reload after the click trigger event.
DNS Prefetching - When this option is enabled, dns-prefetch links are added to the head of the page which instruct prefetch enabled browsers to lookup the dns for the urls needed to load map assets before the assets are needed. This can speed up map loading by not having to wait for the dns lookup when the assets are needed.